Custom budget CDN
This tutorial is a part of Iconify API hosting instructions.
What is CDN? CDN is short for content delivery network. It is a set of servers spread out across the globe that deliver content to a visitor as fast as possible. AnyCast DNS connects visitors to the closest server.
This tutorial is intended to be used if you are setting up your custom Iconify API and want to take advantage of CDN.
Stateless CDN
This tutorial is intended for stateless CDN.
Stateless means every request does not depend on previous request, so if a visitor is connected to a different edge server than he visited before, it wouldn't make any difference.
Iconify API is stateless. It does not allow visitors to store anything, it does not track anything, it does not send any cookies. There is no central server, and each API server works separately from other servers.
Setting up edge servers
First, you need to create multiple origin servers in various parts of the world.
All servers need to be configured to serve exactly the same data for exactly the same host name. You need to configure multiple identical servers. There are plenty of tools that can automate this process; however, they are not part of this tutorial.
For tutorial on how to set up hosting for Iconify API, see hosting tutorial.
Route53
After setting up multiple servers, you want to direct users to the closest server.
Adding multiple "A" records to your domain won't achieve that. You need AnyCast DNS.
AnyCast DNS is expensive. Very expensive. What if you don't have thousands of dollars to spend? Good news is there is one alternative solution: Amazon's Route53 latency routing.
Route53 latency routing works by redirecting the visitor to the closest Amazon datacenter.
What if you are not hosting your websites at Amazon datacenters? You can host at datacenters not far from Amazon (same country or state), which is more than good enough to redirect visitors to the closest of your servers.
Setting up Route53
- You need an AWS account. Sign up at AWS main page.
- Go to Route53 page (sign in if needed).
- Click "Hosted Zones" link, click on your domain or create a new zone.
Then you need to add records for each server you have in your CDN. Click "Create Record Set", enter subdomain name in "Name" field, enter IP address in "Value" field, in "Routing Policy" field select "Latency". That last part is very important: that makes it possible to redirect visitors to the closest server based on latency. Select the region closest to your server's physical location, enter something in "Set ID" field.
If you are running script on AWS service, instead of entering IP select click "Yes" for "Alias" option and select AWS instance.
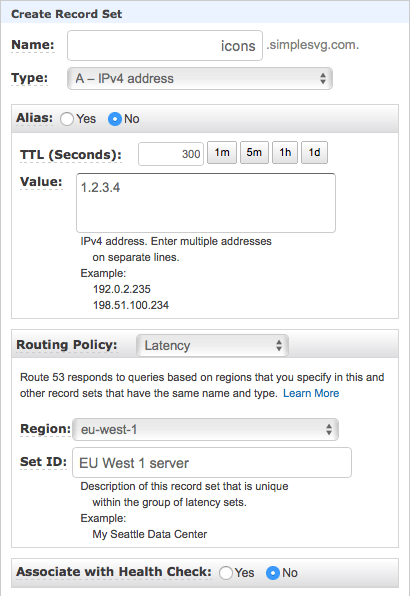
Click "Create" button to add that record.
Create several more records for your other servers. For each record enter the same subdomain, but different IP and a different region.
By the time you are finished, it should look like this:
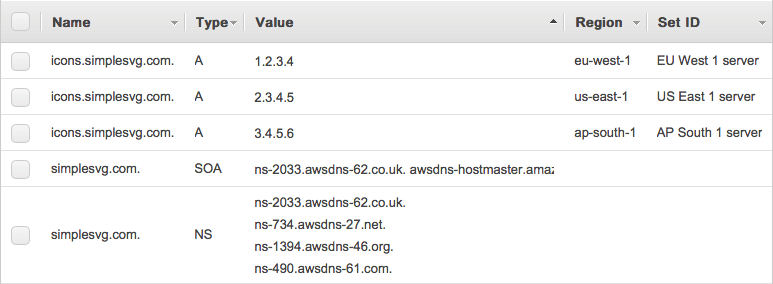
Notice there are 3 records for "icons.simplesvg.com" pointing to different IP addresses with different region set up.
That's it. When visiting icons.simplesvg.com, user will be redirected to one of 3 IPs: 1.2.3.4, 2.3.4.5, 3.4.5.6 depending on which AWS datacenter is the closest. It is precise enough to create a budget custom CDN.
Iconify API
This method is used to host Iconify API, hosted at api.iconify.design.